

How to Get Rid of Milia: A Science-Backed At-Home Routine
Milia are harmless but stubborn, and the right routine can help smooth them over time - here is a science-backed at-home approach led by our Retinol & PHA Treatment Stick.
Author
askINKEY skincare advisor
Published
15 October, 2026
Time to read
6 minutes
Milia are those tiny, hard white bumps that sit just under the surface of your skin, often around the eyes, cheeks, nose and forehead. They are harmless, but they can be stubborn, and picking at them usually makes things worse. The good news is that a simple, consistent routine built around the right ingredients can help smooth milia-prone skin over time.
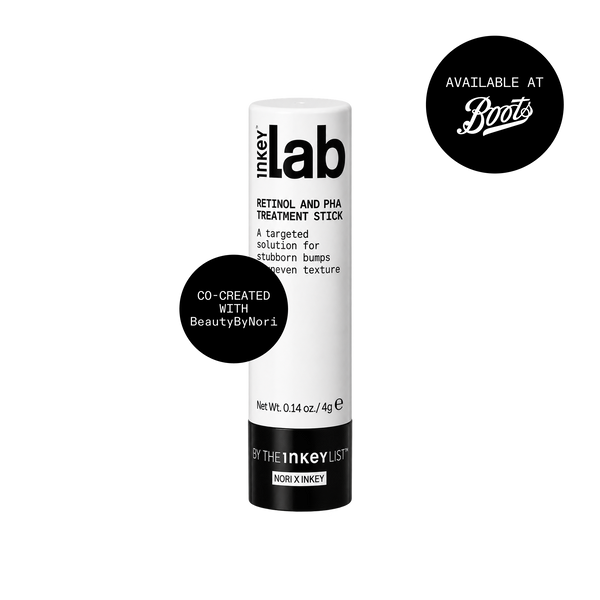
This blog explains what milia actually are, why they form, and what genuinely helps at home. You will find a clear step-by-step routine, the proven ingredients worth using, the common mistakes to avoid, and guidance on when it is time to see a professional. The standout product for this concern is our Retinol & PHA Treatment Stick (£11), which combines two of the most useful ingredients for milia-prone skin, retinol and PHA, in one precise, targeted stick. We will explain exactly how to use it, alongside a few supporting products like our Salicylic Acid Cleanser (£14), below.
What Are Milia? (A Quick Definition)
Milia, sometimes called milk spots, are small cysts filled with keratin, a protein found in your skin. They form when dead skin cells become trapped beneath the surface instead of shedding normally. Unlike spots or whiteheads, milia are not linked to clogged pores in the usual sense, which is why you cannot simply squeeze them away.
Because they are so easy to mix up with other bumps, it helps to know exactly what you are dealing with before you treat it. For a full breakdown of the differences, read our dedicated guide on milk spots vs milia.
Why Milia Form (Common Causes)
Milia can appear for several reasons, and often more than one is at play. The most common causes include:
- A slow natural shedding of dead skin cells, which allows keratin to become trapped.
- Heavy or occlusive products that sit on the surface and trap debris.
- Sun damage over time, which can thicken the skin and make shedding less efficient.
- Skin trauma such as burns, blisters or aggressive exfoliation.
- A lack of gentle, regular exfoliation in your routine.
Understanding the cause matters, because the aim of an at-home routine is to support your skin's natural cell turnover so trapped keratin has an easier time clearing.
Can You Get Rid of Milia at Home? What the Science Says
Many milia, especially in babies, clear on their own without any treatment. In adults they can be more persistent, but a well-chosen routine can help. The evidence points consistently to a few things that make a difference.
Gentle chemical exfoliation helps loosen the bond between dead skin cells so they shed more easily. Topical retinoids are widely recognised by dermatology sources, including the Cleveland Clinic and DermNet, for supporting skin cell turnover, which is why they often feature in milia advice. This is exactly why a product that pairs retinol with a gentle PHA is so well suited to milia-prone skin. And daily sun protection helps prevent the sun-related skin thickening that can make milia more likely in the first place.
What does not work is physical force. You cannot pop milia like a spot, and trying to do so at home risks scarring and infection. The at-home approach is about patience and consistency, not pressure.
The Hero of a Milia-Prone Routine: Our Retinol & PHA Treatment Stick
If you only add one product to your routine for milia-prone skin, make it our Retinol & PHA Treatment Stick (£11). It brings together the two ingredient groups that matter most for this concern in a single, easy-to-use stick.
Here is why it works so well for milia. Retinol supports your skin's natural cell turnover, encouraging trapped dead skin cells to shed more efficiently over time. PHAs are the gentlest of the exfoliating acids, helping to smooth the surface without the harshness of stronger acids. Together they target both the renewal and the exfoliation that milia-prone skin benefits from.
The stick format is a real advantage too. It lets you apply directly and precisely to the small bumps and areas of texture you want to target, rather than treating your whole face. Use it in the evening only, start with two or three nights a week, and build up as your skin becomes comfortable. Always follow with sun protection the next morning, as retinol can make skin more sensitive to the sun. You can read more about how it is formulated in our launch guide, meet the Retinol & PHA Treatment Stick.
The At-Home Milia Routine, Step by Step
Here is a straightforward routine built around the Treatment Stick, with supporting steps to help it work its best. Introduce new actives one at a time, and give your skin a few weeks to respond before judging results.
Step 1 - Gentle Cleansing
Start and end the day with a cleanser that removes build-up without stripping your skin. Over-stripping only forces the rest of your routine to work harder. Our Salicylic Acid Cleanser (£14) uses 2% salicylic acid to help keep pores clear and skin refreshed, which is useful for congestion-prone, milia-prone areas. If your skin is on the drier or more sensitive side, our Milk Cleanser is a gentler option that still removes make-up and SPF.
Step 2 - Target Milia with the Retinol & PHA Treatment Stick
This is the key step. In the evening, apply our Retinol & PHA Treatment Stick (£11) directly to the areas where milia appear. The combination of retinol and PHA supports cell turnover and gentle exfoliation exactly where you need it. Start with two or three evenings a week and build up gradually as your skin adjusts.
Step 3 - Optional Extra Exfoliation for Tolerant Skin
If your skin is comfortable with the Stick and you want to add gentle all-over exfoliation, you can introduce an exfoliating toner on alternate evenings. Our PHA Toner (£14) is the gentlest option, while our Glycolic Acid Toner(£14) offers a slightly stronger resurfacing effect. There is no need to layer multiple acids on the same night, and always listen to your skin.
Step 4 - Lightweight Hydration and Barrier Support
Exfoliating acids and retinol work best when your skin barrier is healthy, so hydration matters. Choose lightweight, non-occlusive formulas rather than heavy creams that can sit on the surface. Our Hyaluronic Acid Serum draws moisture into the skin, and our Omega Water Cream delivers oil-free hydration that sits comfortably under make-up.
Step 5 - Daily SPF
Sun damage is a known contributor to milia, so daily sun protection is one of the most worthwhile habits you can build. It also protects the skin while you are using retinol and exfoliating acids, which can make your skin more sensitive to the sun. Finish every morning routine with our Dewy Sunscreen SPF 30.
Ingredients That Help Smooth Milia-Prone Skin
If you want to simplify things, these are the ingredients worth looking for, and the first two are exactly what you get in our Treatment Stick:
- Retinol: supports skin cell turnover and renewal over time.
- PHAs: the gentlest exfoliating acids, ideal for sensitive or reactive skin.
- Salicylic acid (BHA): helps keep pores clear and refreshes the skin surface.
- Glycolic acid (AHA): a resurfacing acid that supports smoother-looking skin.
- Hyaluronic acid: lightweight hydration that keeps the barrier comfortable.
The aim is not to pile all of these on at once. Lead with the Treatment Stick, add supporting steps gradually, and stay consistent.
What Not to Do (Please Do Not Pick at Milia)
It is tempting, but squeezing, scratching or trying to extract milia at home is one of the quickest ways to cause lasting damage. Because milia are not ordinary spots, there is no opening to squeeze from, and applying force can lead to scarring, redness and infection. Avoid sterile needles and DIY extractions too. Leave any physical removal to a trained professional. Your at-home job is simply to support your skin's natural renewal and be patient.
Milia Around the Eyes
The skin around the eyes is thinner and more delicate, which is why milia so often appear there, and why that area needs a gentler approach. Strong acids and standard retinol are not always suitable so close to the eyes, so take extra care with product choice and placement. We cover this area in detail, including what is safe to use, in our guide to milia under the eyes.
When to See a Professional
If your milia are widespread, persistent, appearing in unusual clusters, or simply bothering you, it is worth seeing a GP or a qualified dermatologist. Clinical options such as professional extraction, cryotherapy or in-clinic treatments can remove stubborn milia safely. Resources from the British Association of Dermatologists and the Cleveland Clinic are a good starting point for understanding your options, and a professional can confirm that the bumps are milia and not something else.
Building Your Routine with The INKEY List
A milia-prone routine does not need to be complicated. Lead with our Retinol & PHA Treatment Stick (£11), then support it with a gentle cleanser, lightweight hydration and daily SPF. To recap the products mentioned above:
- Our Retinol & PHA Treatment Stick (£11) as your hero step for targeted treatment.
- Our Salicylic Acid Cleanser (£14) for clear, refreshed skin.
- Our PHA Toner (£14) or Glycolic Acid Toner (£14) for optional extra exfoliation.
- Our Hyaluronic Acid Serum and Omega Water Cream for lightweight hydration.
- Our Dewy Sunscreen SPF 30 every morning.
Introduce changes gradually, keep it consistent, and give your skin time. Clear guidance, proven ingredients, real results.
Frequently Asked Questions
Got a question?
Our askINKEY team are a friendly bunch of skincare experts with deep product knowledge and zero judgement. Whether you're an ingredient obsessive or just starting out, we'll make it make sense. No question too big. No question too small. We Give A Care, Every Day.


